Want to Search Inside Videos Like a Pro? CLIP-as-service Can Help
Imagine an AI-powered grep command, one that could process a film and find segments matching a text. With Jina AI's CLIP-as-service, you can do that today. We'll show you how.


Wouldn’t it be great if you could search through a video the way you search through a text?
Imagine opening a digitized film, just hitting ctrl-f and typing “Santa”, then getting all the parts of the video with Santa Claus in it. Or just going to the command line and using the grep command:
grep "Santa Claus" Santa_Claus_conquers_The_Martians.mp4
Normally, this would be impossible, or only possible if you had gone through the film and carefully labeled all the parts with a Santa in them already. But with Jina AI and CLIP-as-service, you can create a video grep command for MP4 film with just a few Python functions and a standard computer setup. There is no need for a GPU and no complex AI tech stack to install, just off-the-shelf and open-source Python libraries, with Jina AI Cloud doing all the heavy lifting.
This has immediate applications for anyone who has video data: film archivists, stock image vendors, news photographers, or even regular people who just keep videos from their cellphones around and post them to social media.
Preliminaries
You need Python 3, and you might want to create a new virtual environment before starting. Then, install a few components at the command line with pip:
pip install clip_client "docarray[full]>=0.20.0"This installs:
- Jina AI’s DocArray library
- Jina AI’s CLIP-as-service client
You'll also need an account for CLIP-as-service. If you don't already have one, there are instructions in the Jina AI documentation. Once you have an account, you will need a token. You can get one from your token settings page at Jina AI Cloud, or at the command line:
> jina auth login ⤶

Your browser is going to open the login page.
If this fails please open the following link: https://jina-ai.us.auth0.com/au....
🔐 Successfully logged in to Jina AI as....

> jina auth token create video_search ⤶
╭───────────── 🎉 New token created ─────────────╮
│ 54f0f0ef5d514ca1908698fc6d9555a5               │
│                                                │
│ You can set it as an env var JINA_AUTH_TOKEN   │
╰────── ☝️  This token is only shown once! ───────╯
Your token should looks something like: 54f0f0ef5d514ca1908698fc6d9555a5
Keep your token in an environment variable, or a Python variable if you're using a notebook. You will need it later.
Getting the Data
Loading MP4 video takes just one line of code with DocArray:
from docarray import Document

video_uri = "https://archive.org/download/santa-clause-conquers-the-martians/Santa%20Clause%20Conquers%20The%20Martians.ia.mp4"

video_data = Document(uri=video_uri).load_uri_to_video_tensor()This downloads the trailer to the public domain film Santa Claus Conquers the Martians from the Internet Archive. You can substitute another URL or a file path to a local file to use your own video instead.
The video itself is stored as a numpy array in the Document.tensor attribute of the object:
print(video_data.tensor.shape)

(4264, 640, 464, 3)
The video itself is has 4,264 frames (the first dimension of the tensor), each measuring 640 pixels by 464 pixels (the second and third dimensions), and each pixel has three color dimensions (conventional RGB in the fourth dimension).
You can play the video in a notebook with the Document.display() method:
video_data.display()You can also use DocArray to view individual frames by their frame number. For example, frame #1400:
import numpy

Document(tensor=numpy.rot90(video_data.tensor[1400], -1)).display()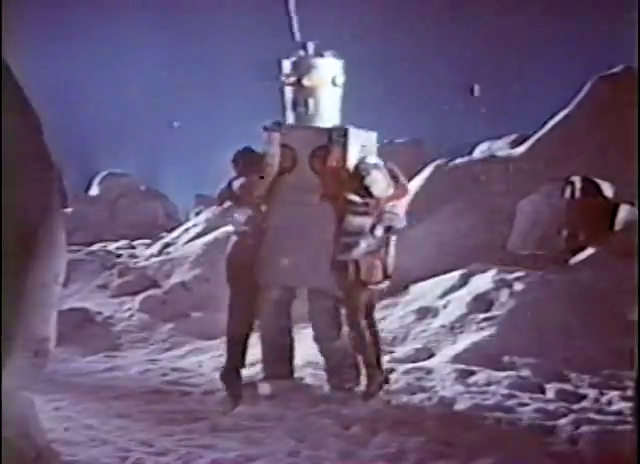
And we can extract clips from the video by giving specific start and end frame numbers:
clip_data = video_data.tensor[3000:3300]
Document(tensor=clip_data).save_video_tensor_to_file("clip.mp4")
Document(uri="clip.mp4").display()Extracting Keyframes
The procedure we’re using to search in videos is to extract keyframes and then perform our search on just those still images.
A keyframe is a frame in a video that is the first after a break from smooth frame-to-frame transition. This is the same as a cut in film editing. We can identify them by going through the video frame by frame and comparing each frame to the next one. If the difference between the two frames is more than some value, we take that to mean that there was a cut, and the later frame is a keyframe.
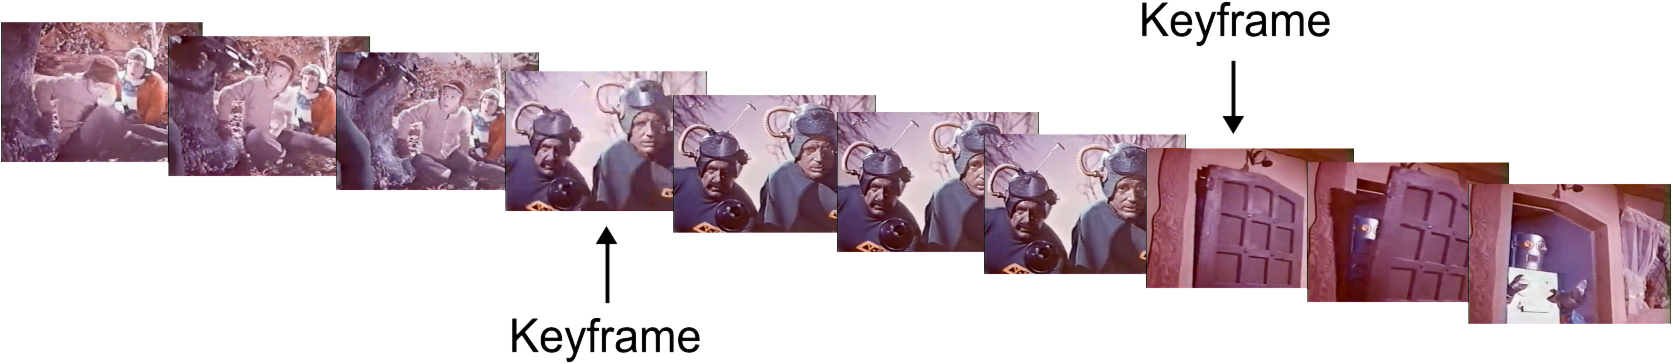
DocArray will automatically collect keyframes as it loads the video with the method Document.load_uri_to_video_tensor() and store them in the Document.tags dictionary under the key keyframe_indices:
print(video_data.tags['keyframe_indices'])

[0, 25, 196, 261, 325, 395, 478, 534, 695, 728, 840, 1019, 1059, 1131, 1191, 1245, 1340, 1389, 1505, 1573, 1631, 1674, 1750, 1869, 1910, 2010, 2105, 2184, 2248, 2335, 2585, 2618, 2648, 2706, 2756, 2788, 2906, 2950, 3050, 3100, 3128, 3190, 3216, 3314, 3356, 3421, 3514, 3586, 3760, 3828, 4078]
The frame numbers of the keyframes are stored in the Document.tags dictionary under the key keyframe_indices.
Performing Search
First, extract all the keyframes as images, and put each one into its own Document. Then compile all the frames into a DocumentArray object:
from docarray import Document, DocumentArray
from numpy import rot90

keyframe_indices = video_data.tags['keyframe_indices']
keyframes = DocumentArray()
for idx in range(0, len(keyframe_indices) - 1):
	keyframe_number = keyframe_indices[idx]
    keyframe_tensor = rot90(video_data.tensor[keyframe_number], -1)
    clip_indices = {
        'start': str(keyframe_number),
        'end': str(keyframe_indices[idx + 1]),
    }
    keyframe = Document(tags=clip_indices, tensor=keyframe_tensor)
    keyframes.append(keyframe)
The code above uses the Document.tags dictionary to store the frame number (as start) and the frame number of the next keyframe (as end) so that we can extract a video clip corresponding to that keyframe.
Then access CLIP-as-service, passing it the query text – in the example "Santa Claus" – and the collection of keyframe images, and it will return the images ranked by how well they match the query text:
from docarray import Document, DocumentArray
from clip_client import Client

server_url = "grpcs://api.clip.jina.ai:2096"

# substitute your own token in the line below!
jina_auth_token = "54f0f0ef5d514ca1908698fc6d9555a5"

client = Client(server_url,
                credential={"Authorization": jina_auth_token})
query = Document(text="Santa Claus", matches=keyframes)
ranked_result = client.rank([query])[0]
We transmit the query and keyframe images to Jina AI Cloud, and CLIP-as-service calculates an embedding vector for the text query and for each keyframe. Then, we measure the distance between the keyframe vectors and text query vectors. We return a list of keyframes ordered by their proximity to the text query in the embedding space.
You can see this represented in the figure below.
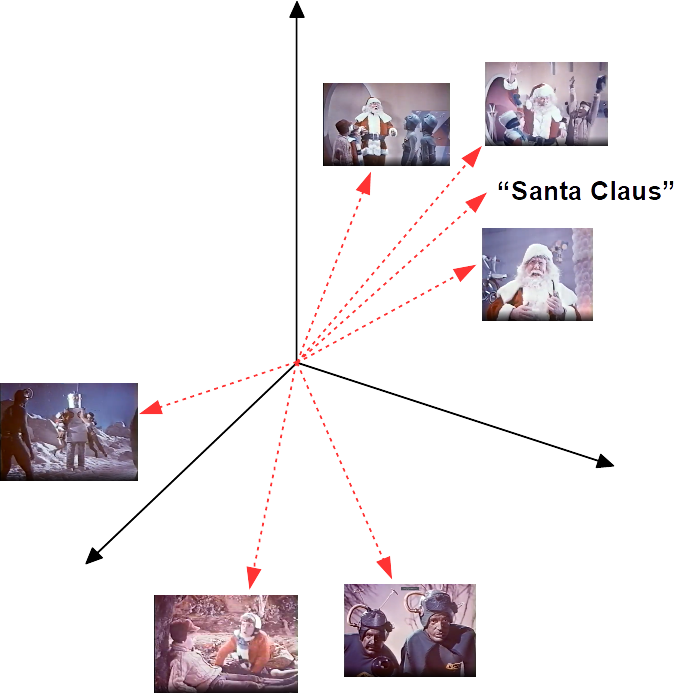
The query reorders the keyframe images in Document.matches in order from the best match to the worst.
print(ranked_result.matches[0].tags)

{'start': '2105', 'end': '2184'}
You can see in the Document.tags section that we've retained the information about this keyframe: It is frame #2105 and the next keyframe is at #2184. With this information, we can get the short video clip that this matches:
match = ranked_result.matches[0]
start_frame = int(match.tags['start'])
end_frame = int(match.tags['end'])
clip_data = video_data.tensor[start_frame:end_frame]
Document(tensor=clip_data).save_video_tensor_to_file("match.mp4")
Document(uri="match.mp4").display()The top five clips all contain Santa Claus:
|
|
|
|
|
This quick and simple technique brings very sophisticated multimodal AI to users with only a standard computer setup. CLIP-as-service is a powerful tool for anyone who needs to search through large volumes of digital media to find what they’re looking for. It saves time and helps you get the most out of your digital media collection.
So the next time you need to find Santa Claus, CLIP-as-service is here to help you look!